Network Boot
The easiest way to serve images to the Pi is over the network. There are multiple possible ways to get started with a single Cube, including network boot or local options like a USB drive with an bootable image.
Since the main focus of the customized network boot process is the ability to deploy the cube in an bigger and versatile environment, the described methods may have some downsides in a local environment in some cases. Additional functionality to fit all use cases will likely be released later. Suggestions are always welcome.
The Rasperry-Pi 4 supports the network boot protocol PXE more or less according to the standard. There are multiple ways to run the Pi completely without an additional SD Card. The intended way is to load the Firmware and the Linux kernel over PXE and mount the root filesystem from a NFS share. But this approach has some downsides when we want a very versatile and efficient solution. Because of we created a solution that allows too start customized linux images directly in the RAM of the Pi. Utilizing parts of the Rasperry-Pi PXE implementation and a custom bootloader. More informationen about the Raspberry Pi Network Boot implementation and the implementation used in the Pi-Lab can be found here in the future.
caution
The images in the RAM will not persist changes on shutdown or reboot.
At the Time it's only possible to start the custom images with a special DHCP Server configuration. The easiest to achieve this is by using our the pre-configured container based network boot setup and a separate subnet for the cube.
Docker-Compose files and helper scripts to setup a boot environment for a Pi-Lab Cube can be found in this repository.
Boot image in RAM
At the time there are two images available. The custom PilabOS image and a slightly customized version of the Rasperry Pi OS image. The PilabOS image provides the podman container runtime and with access to the h_da fbi ldap server, it's possible to log into the image with an h_da user account. The customized Rasperry Pi OS image is intended to fit a wider range of use cases. The only difference to the original image is, that it can be booted into the RAM over the network, without a persistent storage attached. But be careful, you will loss all data when rebooting the device.
Customized Rasperry Pi OS (PXE into RAM support)
Customized Ubuntu Images (PXE into RAM support)
caution
At the moment you need to be able to log into gitlab to clone repositories or pull container images.
PC as server and gateway#
An easy and fast way to setup a working environment is to use your own pc or laptop as server and gateway for the Pis. In this setup the Pis will be placed on a separate subnet. To achieve this you will need an unused ethernet port (USB to LAN adapters are a great for this purpose) and docker-compose installed. You can either connect the Cube with the lower port directly to the ethernet port on your computer or both ports on the Cube over a separate switch. This makes it possible to control the power of the cube over the network as described here. The following network plans show the two configurations.
- Clone Git repository
git clone https://code.fbi.h-da.de/pi-lab/networkboot.git- Set static ip and mask 10.12.0.1/16 on network interface
- Go into folder
/compose/small - Download the latest Pi-Lab Image
- PilabOS
- Rasperry Pi OS
- Ubuntu
info
Information on how to access the PilabOS images can be found below in the section below.
wget -O - https://userv.fbi.h-da.de/pub/pilab/releases/v1.8/pilabos-worker-dev-64bit-v1.8.tar.xz | tar -xJf - -C bootfilesinfo
Connect over SSH with user pi and password raspberry.
wget -O - https://userv.fbi.h-da.de/pub/pilab/releases/raspios/2021-05-07-raspios-buster-armhf-lite-pilab.tar.xz | tar -xJf - -C bootfilesinfo
Adjust user-data in bootfolder and set webserver ip in cmdline.txt (more information: cloud-init)
wget -O - https://userv.fbi.h-da.de/pub/pilab/releases/ubuntu/ubuntu-20.04.2-preinstalled-server-arm64+raspi-pilab.tar.xz | tar -xJf - -C bootfiles- Log into the container registry
docker login registry.code.fbi.h-da.de- Start container setup
docker-compose upTo allow the Pis to have access to the internet you need to setup a NAT to forward the ip packages from the separate subnet to your home network. For this purpose you can use the script nat-network.sh in the /scripts directory of the repository. <IN> is your Cube subnet, <OUT> your home network.
sudo ./nat-network.sh <IN> <OUT>Now you can start one of the Pis and it will automatically get its configuration from the DHCP Server and boots the Pi-Lab image, placed in the /compose/small/bootfiles folder.
Pi Server and Gateway#
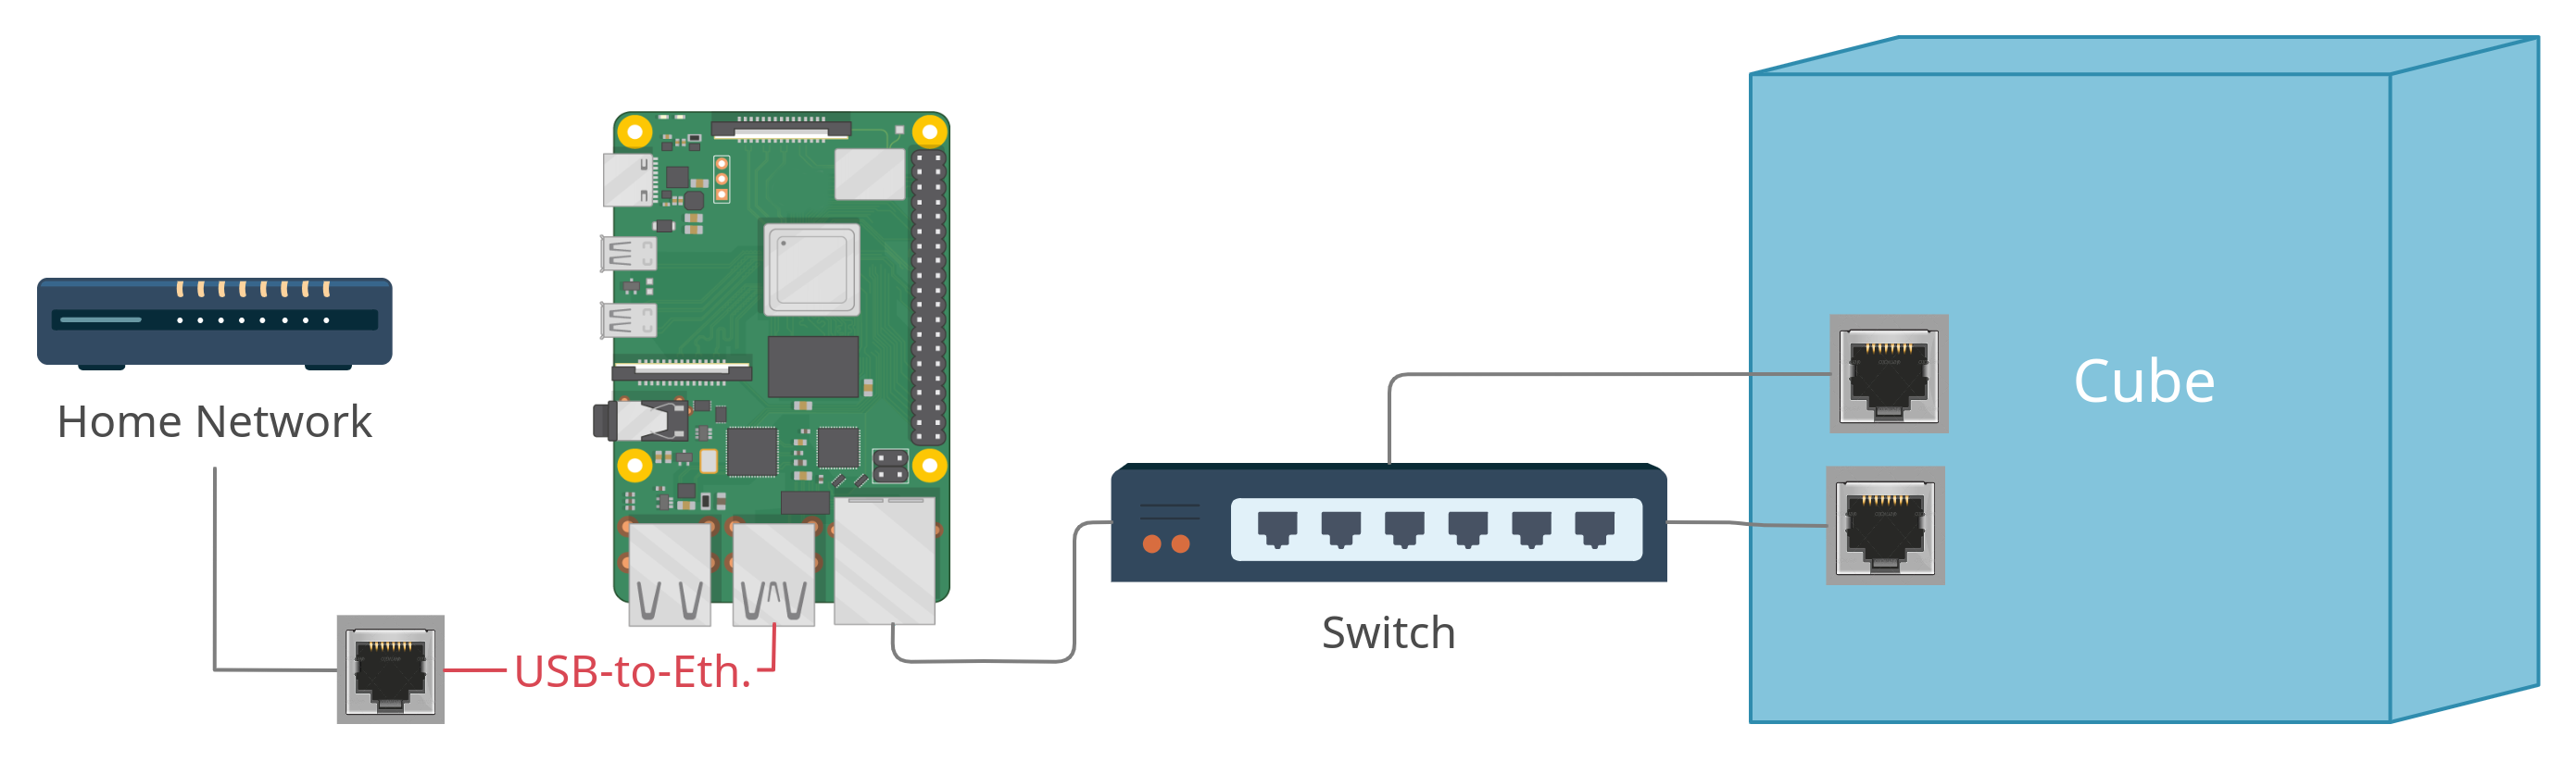
This setup is similar to the first one but uses a separate Rasperry-Pi as server and gateway. The Cube itself is again placed on its own pre-configured subnet. You will need an USB to Ethernet adapter to connect it to the Rasperry-Pi and a sd-card. If you don't have an unused Pi lying around you can use the head Pi for that purpose. Too ease up that process we created a cloud-init script that automatically configures the Pi. Wire up the setup as shown in the following network plan. Make sure you connect the USB-Eth. Adapter to your home network and the build in port to the Cube.
info
Information on how to access the Pis can be found below in the Remote Access section
Install the Ubuntu Server 20.04.2 LTS 64bit Image onto the SD card. You can use this guide if you're unfamiliar with the process.
Place the files in this folder from
networkbootrepository into thesystem-bootpartition of the sd card overwriting the existing ones.Insert the sd card into the Pi and start it. The first boot can take a while until everything is configured.
To access the subnet with the Cube from your home network you need tell your computer how to route into it. To find the IP of the Pi you can use the host list of your router or resolve ip through its mDNS (zeroconf) entry.
mDNS on Linux
Avahi is a free and popular implementation for mDNS and in many cases already pre-installed on your distro.
Resolve ip with $ avahi-resolve --name pilabGateway.local.
On Windows:
route ADD 10.12.0.0 MASK 255.255.0.0 <RasperryPi-IP> 1On Linux:
sudo ip route add to 10.12.0.0/16 via <RasperryPi-IP> SSH Login:#
The configured gateway routes packages between the Cube subnet and the home network. Ands acts as a boot server for the Pis in the Cube. You can log into the gateway through SSH. The standard password is robot. At first login you will be requested to set a new password.
ssh robot@pilabGateway.localAttach to home network#
This setup allows you to seamlessly integrate the cube into your home network. This setup has some advantages and some limitations. You will not need a separate subnet or a device functioning as a gateway. But you will need a device to serve the images from. This can be any device attached to the network. But you can't rely on the easing naming scheme to access the Pis over the network, because they will get their IP configuration and hostname from your DHCP Server. In some cases the Arduino in the Cube might not get an IP address, if the DHCP server does not support DHCP broadcasts.
- Clone Git repository
git clone https://code.fbi.h-da.de/pi-lab/networkboot.gitGo into folder
/compose/homeDownload the latest Pi-Lab Image
- PilabOS
- Rasperry Pi OS
- Ubuntu
info
Information on how to access the PilabOS images can be found below in the section below.
wget -O - https://userv.fbi.h-da.de/pub/pilab/releases/v1.8/pilabos-worker-dev-64bit-v1.8.tar.xz | tar -xJf - -C bootfilesinfo
Connect over SSH with user pi and password raspberry.
wget -O - https://userv.fbi.h-da.de/pub/pilab/releases/raspios/2021-05-07-raspios-buster-armhf-lite-pilab.tar.xz | tar -xJf - -C bootfilesinfo
Adjust user-data in bootfolder and set webserver ip in cmdline.txt (more information: cloud-init)
wget -O - https://userv.fbi.h-da.de/pub/pilab/releases/ubuntu/ubuntu-20.04.2-preinstalled-server-arm64+raspi-pilab.tar.xz | tar -xJf - -C bootfiles- Set the appropriate IP address in the
docker-compose.ymlandcmdline.txt. Thebootfilesargument on the kernel command line overrides thefilenamelocation from the dhcp server.
export IP=<your_ip_address> && sed -i "s|IP=.*|IP=${IP%.*}.255|" docker-compose.yml && sed -i "s|$| bootfile=http://${IP}:8080/initramfs.tar.xz|" bootfiles/cmdline.txt- Start container setup
docker-compose upNow you can start one of the Pis and it will automatically get its configuration from the DHCP Proxy Server and boots the Pi-Lab image, placed in the /compose/home/bootfiles folder.
Remote Access#
tip
You can find the number of your Cube on the right side of the Cube.
Gateway#
The Pilab Gateway assigns adresses in the 10.12.0.0/16 range. All for the Pi-Lab project build Cubes already have their own host declaration in the DHCP config file. The third bytes indicates the number of the Cube and the fourth byte stands for the Pi in the stack. This allows to access every Pi in an easy and memorable way. The Pis are numbered from bot to the top of the cube. If you have a mDNS client installed you can also use theit hostnames instead of the ip. The following tables shows the ip and hostname assignments for cube number four.
| Hostname | IP | Bezeichnung |
|---|---|---|
| cube4-1.local | 10.12.4.1 | Pi 1 |
| cube4-2.local | 10.12.4.2 | Pi 2 |
| cube4-3.local | 10.12.4.3 | Pi 3 |
| cube4-4.local | 10.12.4.4 | Pi 4 |
| cube4-5.local | 10.12.4.5 | Pi 5 |
| cube4-6.local | 10.12.4.6 | Pi 6 |
| cube4-head.local | 10.12.4.6 | Pi 6 |
| - | 10.12.4.10 | Arduino |
| - | 10.12.4.11 | Switch |
Home network#
If you attach your Cube directly to the home network you need to determine the ip address the Pis will get. Alternatively you can use mDNS and their respective serial numbers as hostnames.
Determine the ip address with arp#
arp -na | grep -i "dc:a6:32"Use .local hostnames#
You can use mDNS to access the Pis through their static hostnames that are derived from their respective serial number. The inventory list with all cubes can be found below. On most operating systems mDNS works out of the box. If you use Linux make sure the avahi-daemon is installed and enabled.
SSH#
You can access the Pis through SSH. If you use the development images (worker-dev) you can log into the Pis with the root and without using a password. Additionally you can use the user ansible and the ssh key provided in the PilabOS repository.
Example: Gateway
ssh root@cube4-1.localExample: Home network
ssh root@pilab-8c332b61.localBoot with rootfs on NFS share
The following links describe how to setup a boot environment that uses separate NFS shares for all Pis and uses the Raspian image from the Raspberry Pi foundation.
Boot the Pis from USB
Since the sd card slots of the Pis are very hard to access. It's possible to boot the Pis from an USB stick. To get this to work you first need to update the EEPROM configuration. A guide on how to do this can be found here.